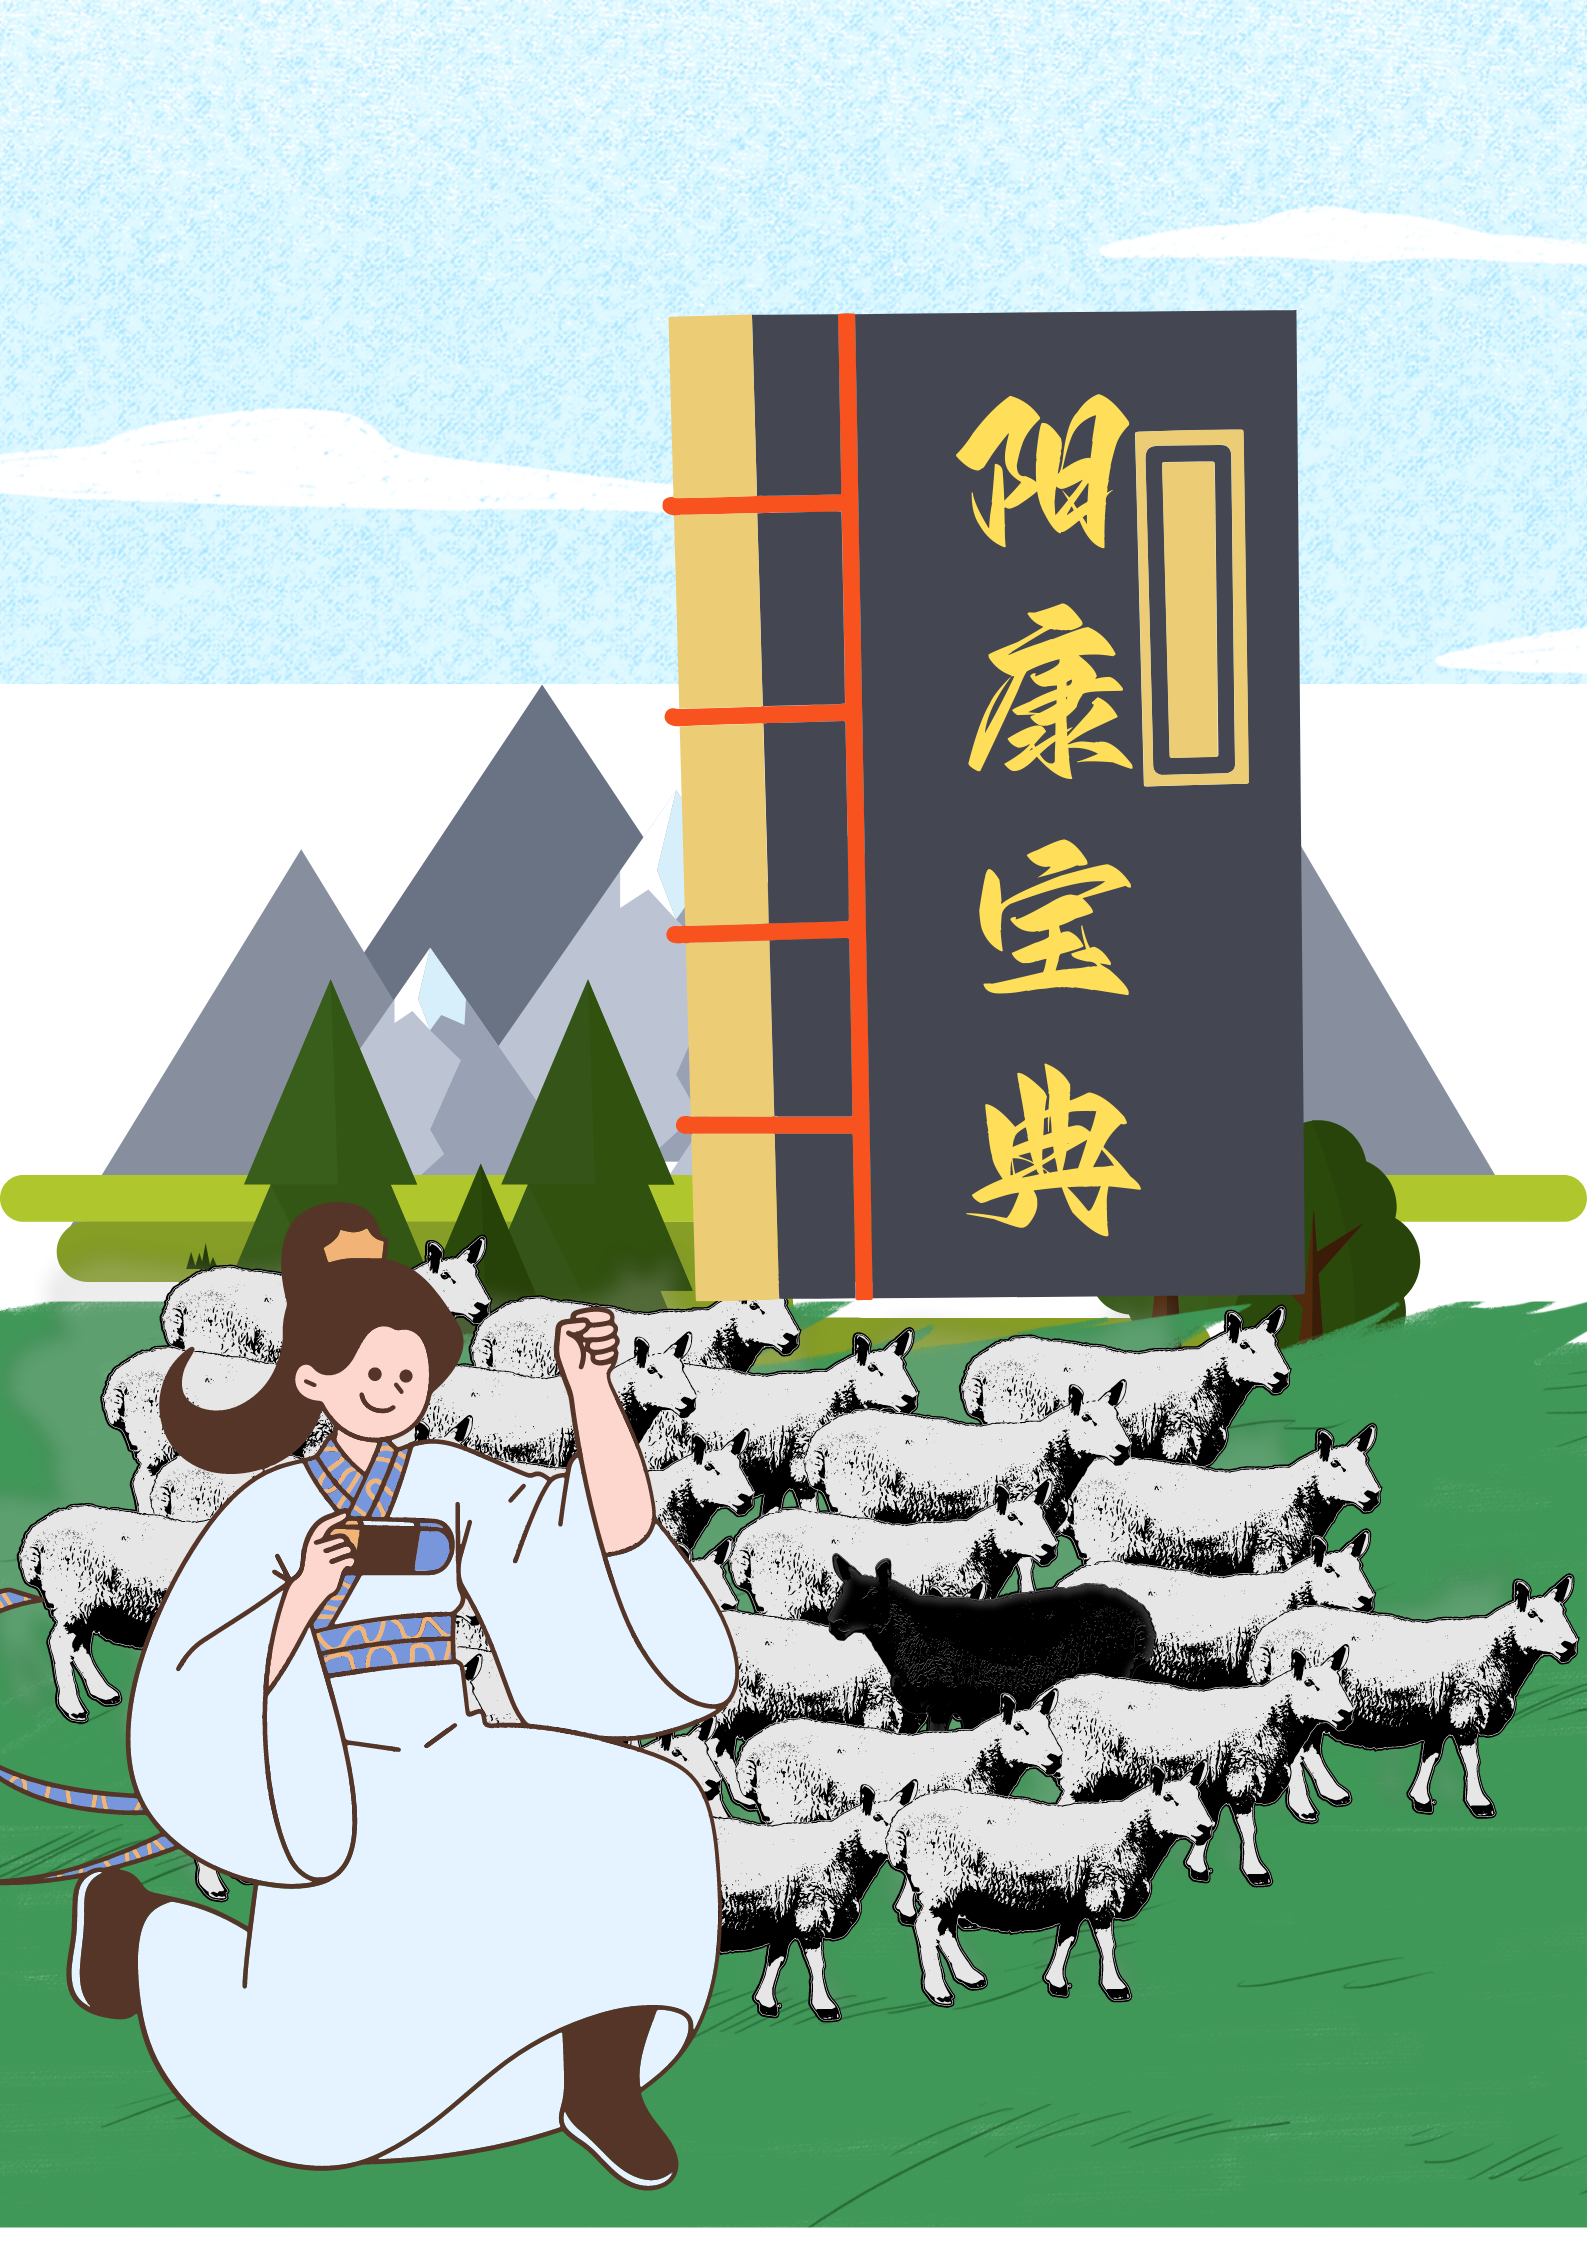
项目名称: 阳康宝典
简介:
2022年12月26日,深夜二十三点零一分,国家卫健委发布2022年第7号公告:将新型冠状病毒肺炎更名为新型冠状病毒感染。与此同时,国务院联防联控机制发布对新型冠状病毒感染实施“乙类乙管”总体方案,宣告全民抗疫的时代画上了终止符。
随着国家的逐步放开,人口流动量也逐渐增大,许多人因为个人防护不到位而不幸中招,这也给其他人带来了一丝焦虑与恐慌。
没变“羊”却不知如何科学保护自己?
不幸变“羊”后不知如何调理,或是因此产生的负能量不知向谁诉说?
少年,特此为你准备了一本《阳康宝典》,助力未“羊”人时时刻刻远离病毒侵扰,助力“羊”们早日康复!
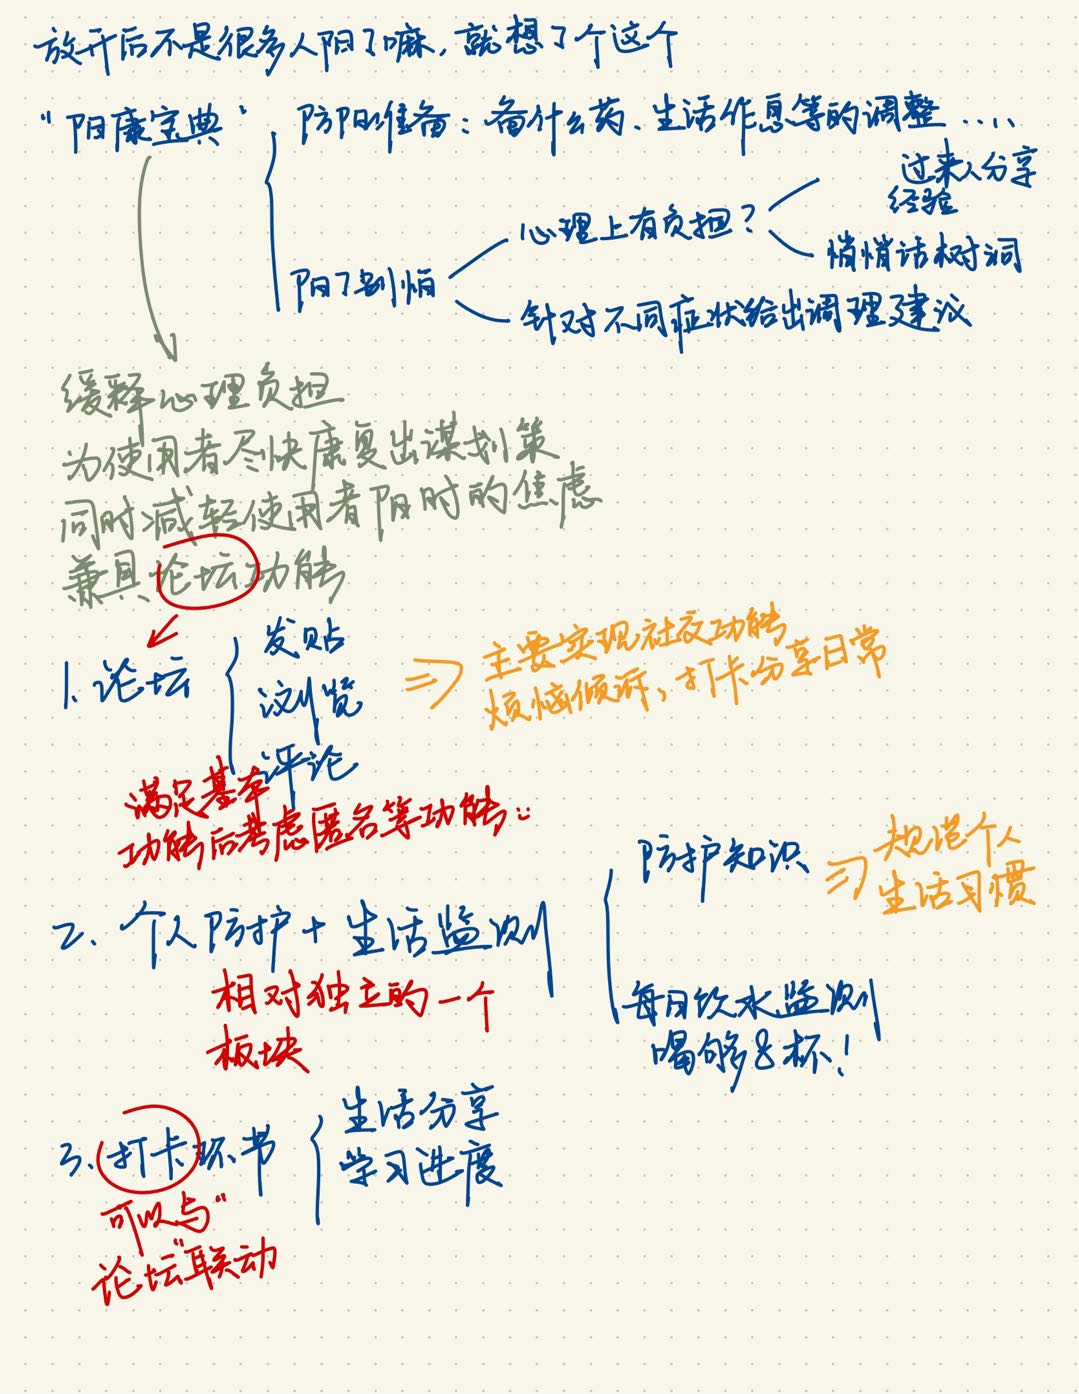
创意过程(思维导图):
四象限法:
商业模式画布:
- 客户细分:未“羊”人、“羊”、“阳康”患者
- 价值主张:为用户提供防疫科普、心理疏导服务
- 渠道通路:用户自发推广
- 客户关系:相互依赖型
- 收入来源:公益性质,用户可以自发支持
- 核心资源:用户使用量、医疗资讯的准确度
- 关键业务:小程序为弱运营,只需要对功能进行及时维护,及时debug,吸取用户意见开发新功能
- 重要伙伴:心理咨询机构、专业医疗机构
- 成本结构:主要集中于维护费用
用户分析:
目标用户:未“羊”人、“羊”、“阳康”患者
未“羊”人:身边亲友大部分已经感染,自己会因此紧张焦虑,担心自己也会中招,甚至因此出现”幻阳症”。
“羊”:康复过程十分难受,易产生许多负能量,如不及时排遣就不利于自身心理健康。
“阳康患者”:作为过来人,可以为身边的小“羊”人提供暖心的安慰以及战胜病魔的经验之谈。
用户画像:
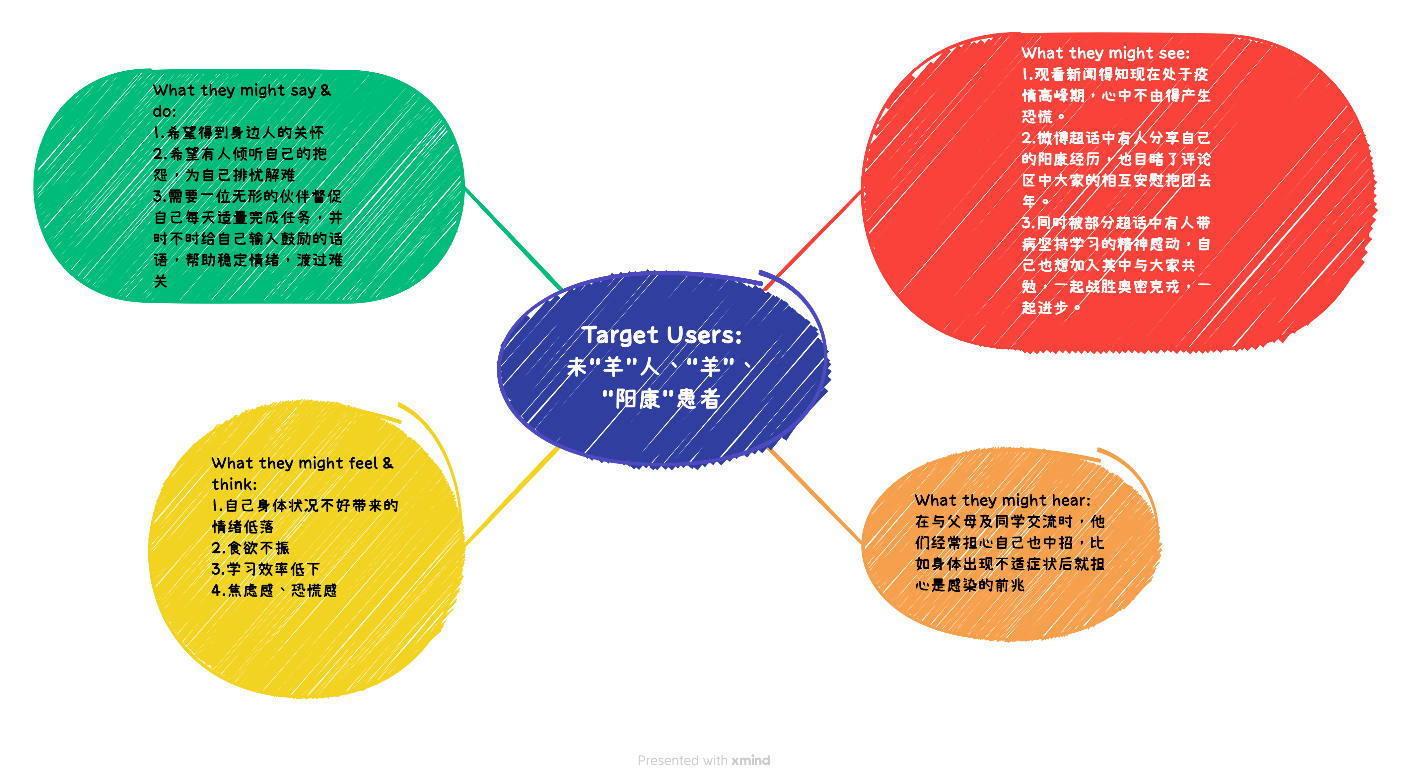
所听:在与父母及同学交流时,他们经常担心自己也中招,比如身体出现不适症状后就担心是感染的前兆。
所见:
- 观看新闻得知现在处于疫情高峰期,心中不由得产生恐慌。
- 微博超话中有人分享自己的阳康经历,也目睹了评论区中大家的相互安慰抱团去年。
- 同时被部分超话中有人带病坚持学习的精神感动,自己也想加入其中与大家共勉,一起战胜奥密克戎,一起进步。
所想&所感:
- 自己身体状况不好带来的情绪低落
- 食欲不振
- 学习效率低下
- 焦虑感、恐慌感
所说&所做:
- 尽己所能去安慰身边亲友
痛点&需求:
| 痛点 | 需求 |
|---|---|
| 对如何进行自我防护、感染后如何自我调理毫无头绪 | 急需一款程序来为自己提供贴身的健康指导 |
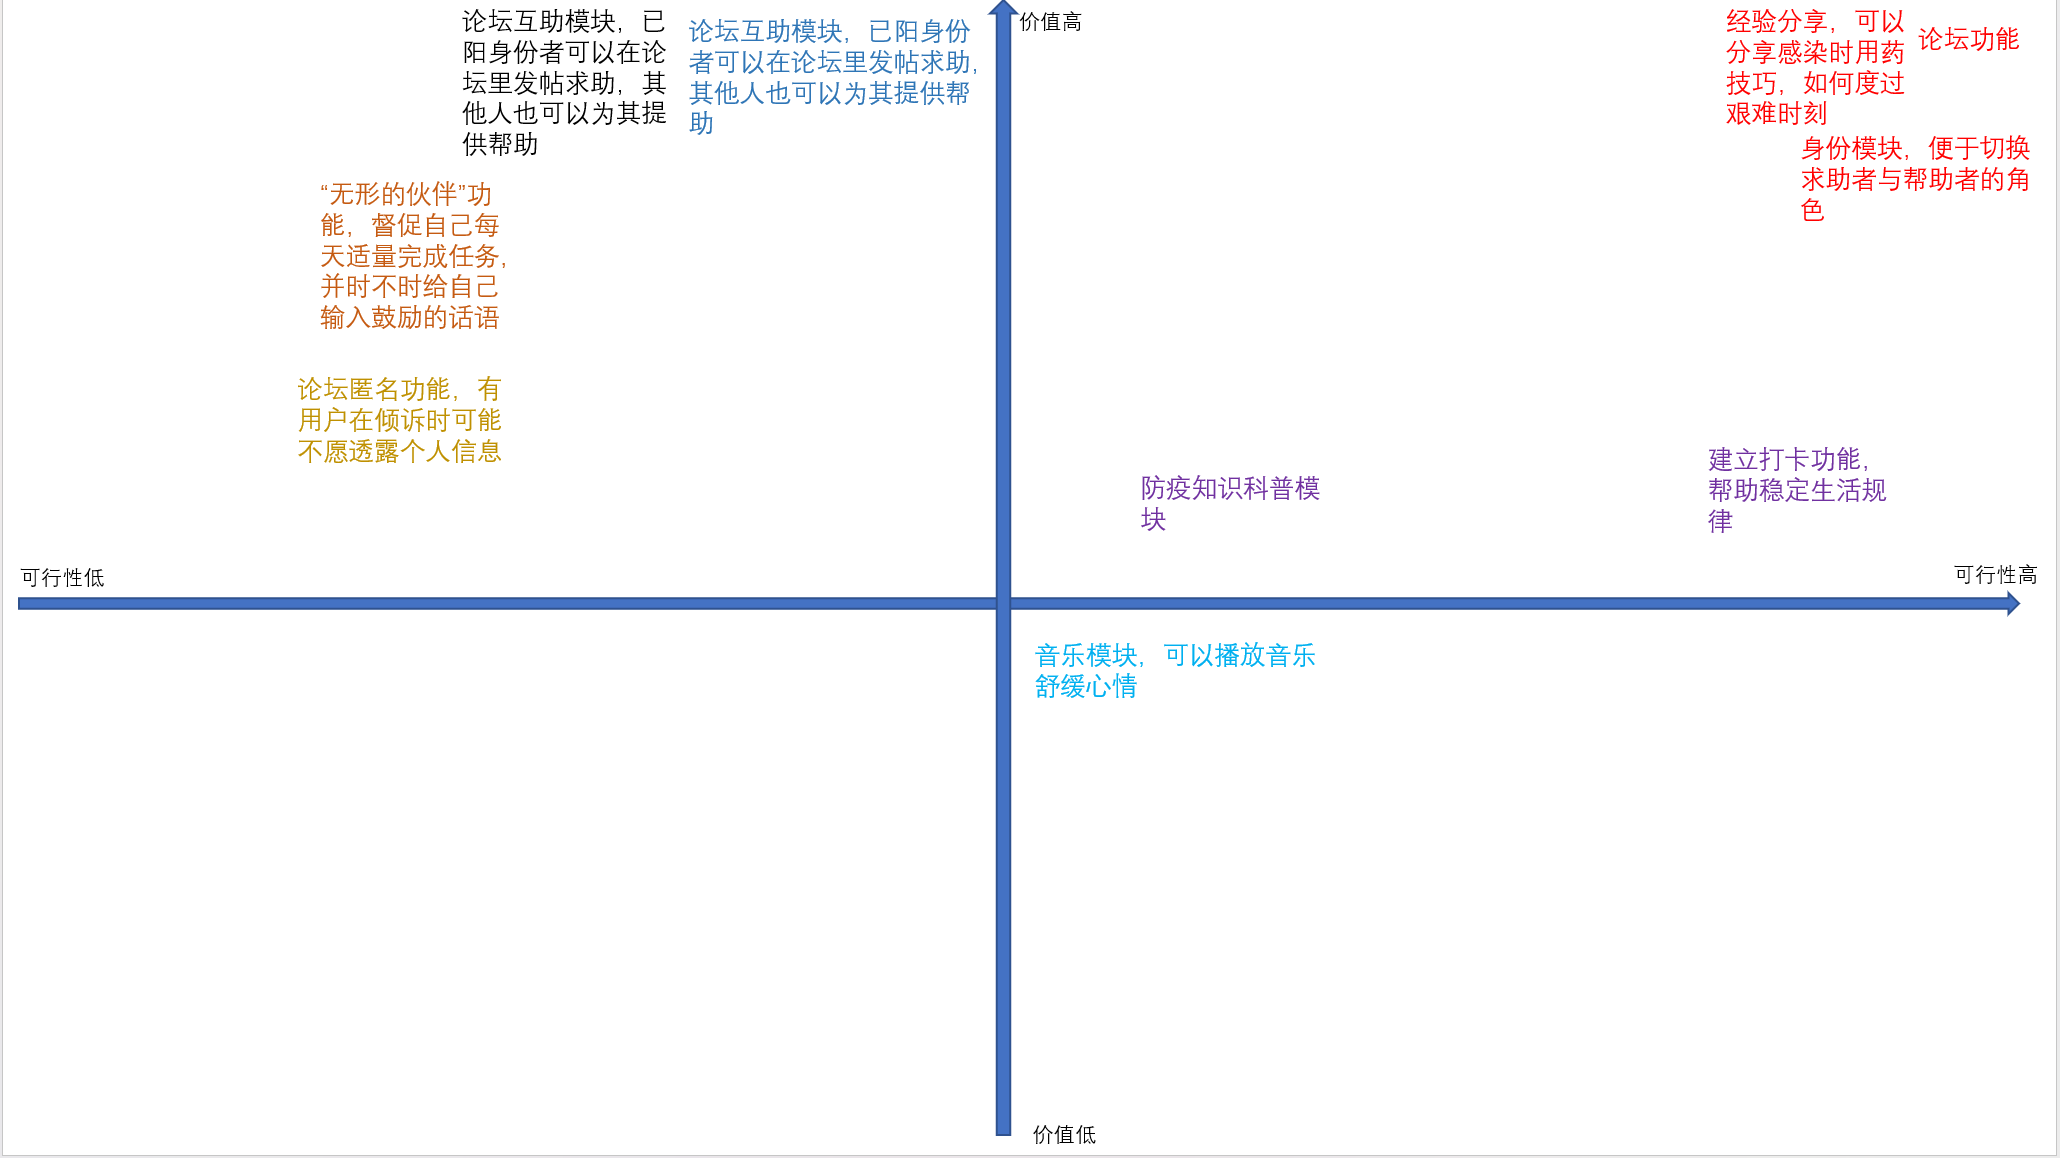
| 康复期间有千种愁绪,更与何人说? | 需要一个释放自己负面情绪、接受他人温暖关怀的窗口 |
| 感染期间学习效率低下,自控力不足,可患病时身体不适,情绪不稳定 | 需要一位无形的伙伴督促自己每天适量完成任务,并时不时给自己输入鼓励的话语,帮助稳定情绪,渡过难关 |
场景分析(用户的使用路径图):
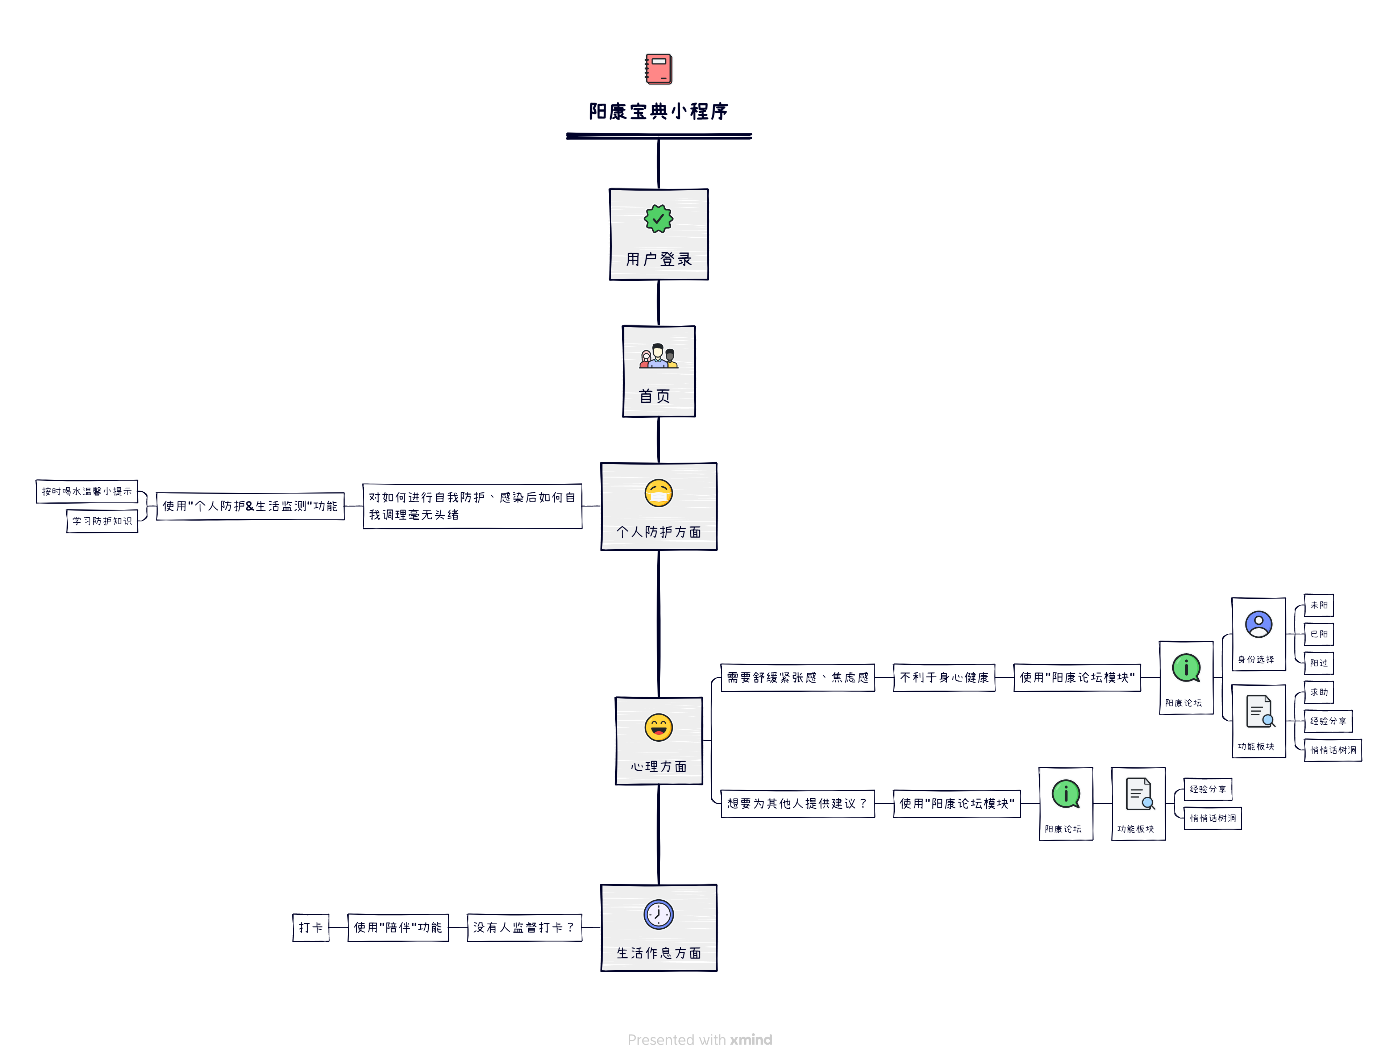
系统功能拆解:
分析:
| 小程序核心功能 | 技术模块 |
|---|---|
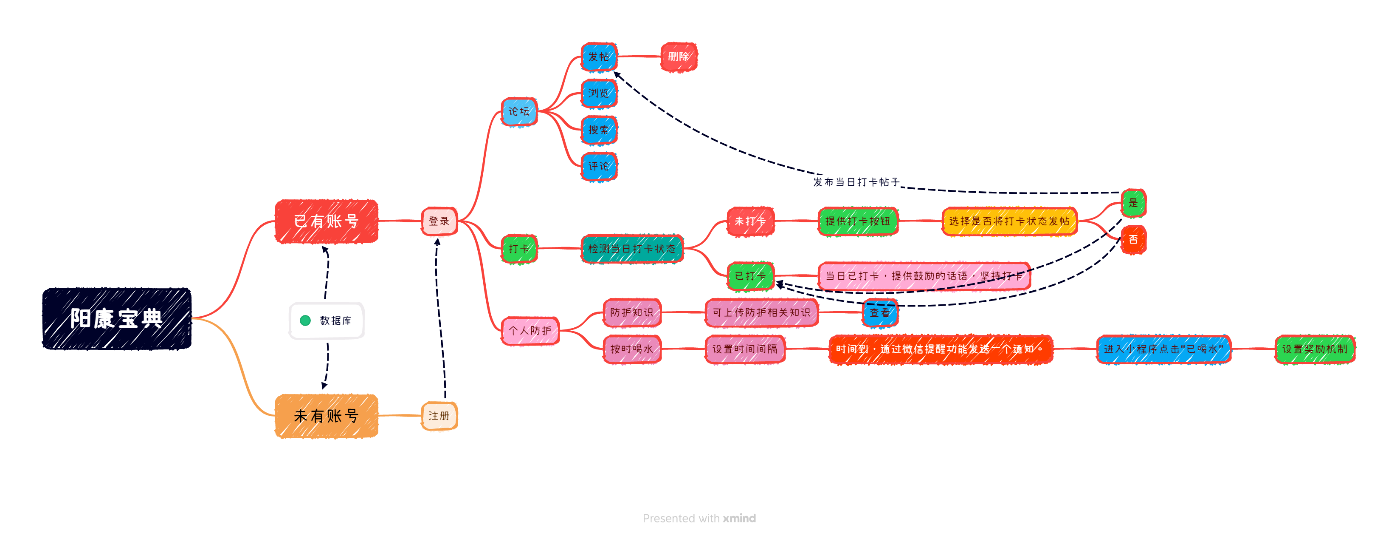
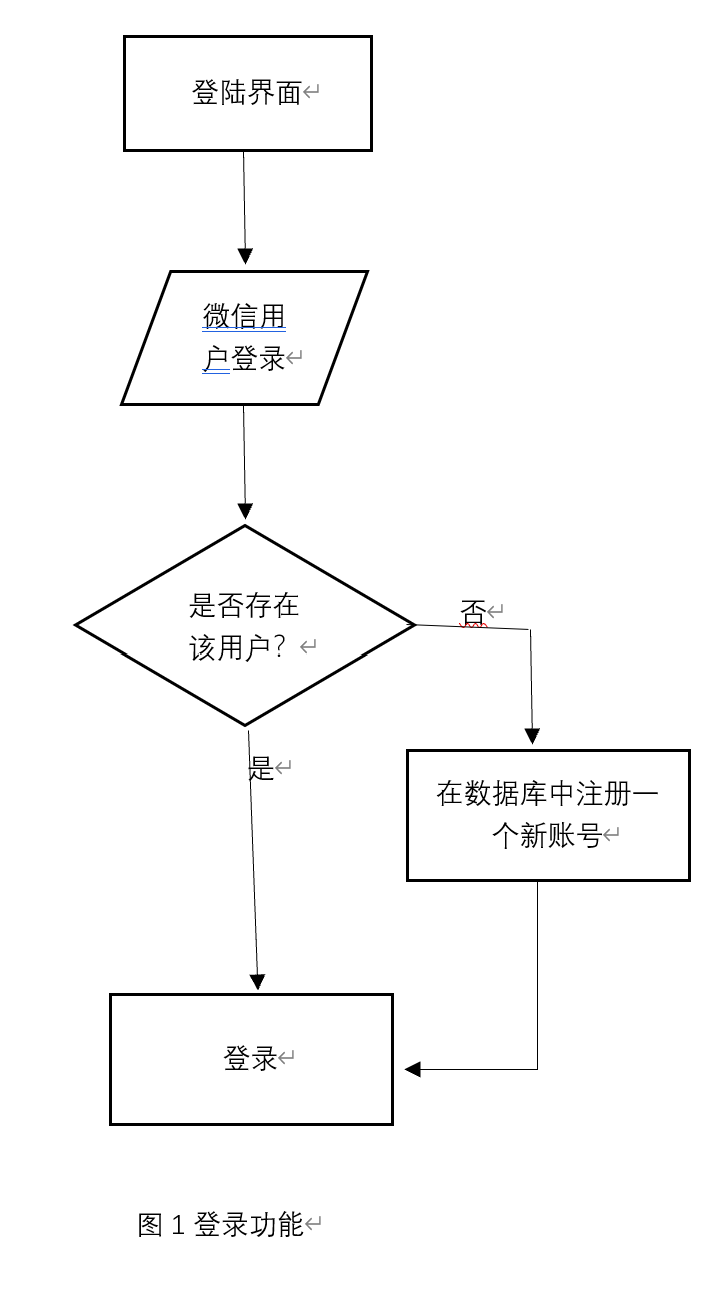
| 用户登录/注册 | 使用微信小程序提供的userinfo获得用户微信名称头像,并判断在云数据库是否有相应用户:1.无,则在数据库中为其创建一个新的用户,名称与头像默认与微信一致(可后续在小程序中修改)2.有,则调用数据库中该用户信息,实现登录功能。 |
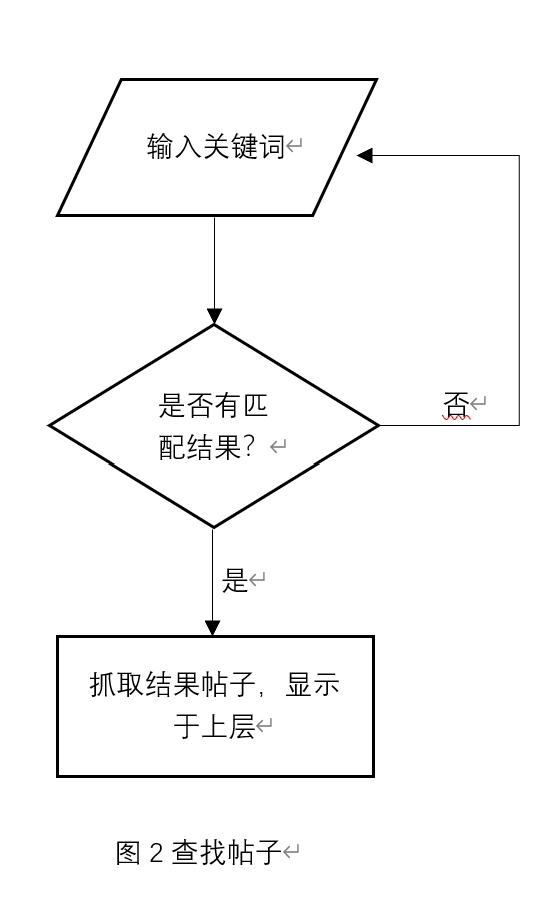
| 论坛 | 需用到云开发数据库功能,网上有大量微信小程序版论坛免费模型,可以借鉴使用,大体功能为发帖、浏览、评论、搜索、删除。 |
| 打卡功能 | 外接蜂鸣器、开关等硬件,并配备有OLED显示屏实时报时,当到达用户设定时间时,蜂鸣器开始工作,响铃1分钟,在此期间用户按下按钮开关即可停止。从而实现提醒功能(比如提醒用户到达喝水的时间了,此刻畅饮一杯凉开水!) |
| 个人防护&生活监测 | 提前搜集好防护小知识上传至服务器,在该模块用户可以查看防护知识,并可以自己设置按时喝水提醒,每隔多长时间提醒一次喝水,与打卡提醒实现差不多。 |
系统功能架构:
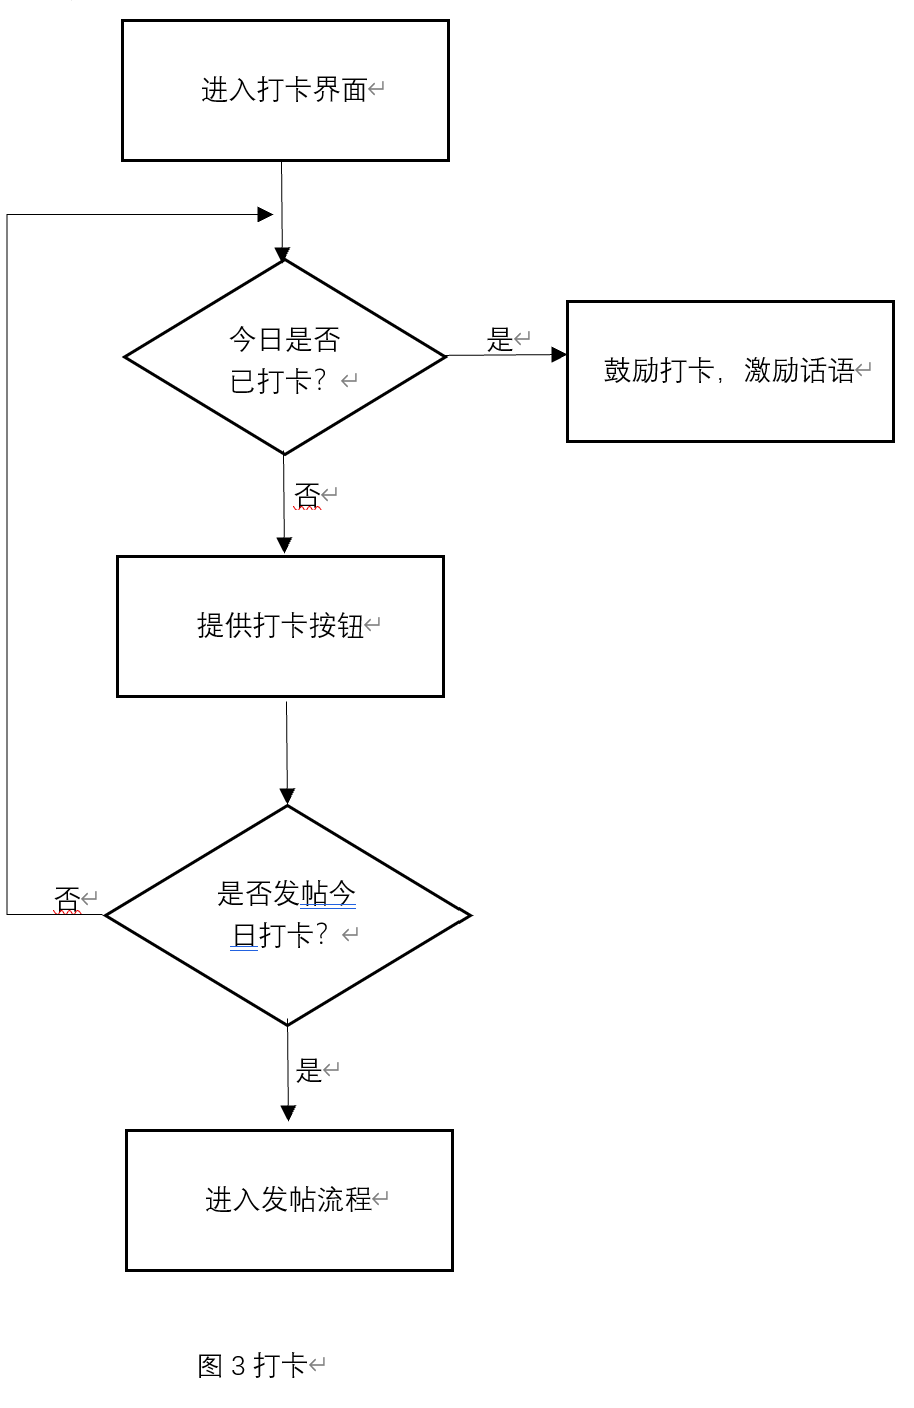
流程图:
功能实现
- 小程序
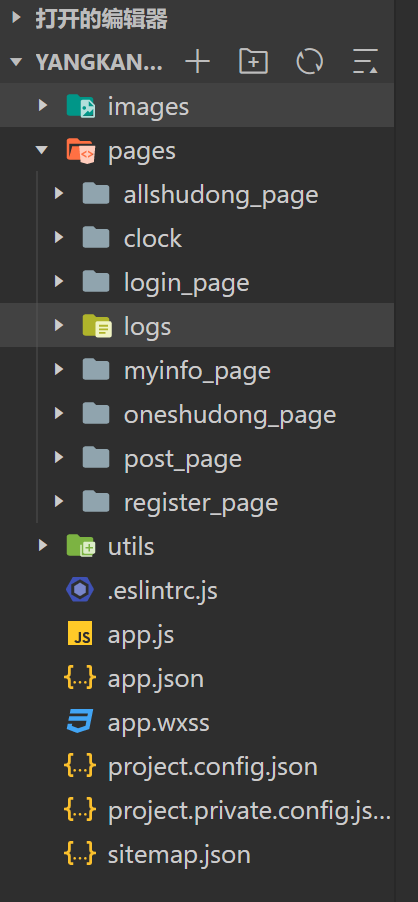
文件结构:
登陆界面:

- Wxml:
<!--pages/login/login.wxml-->

<view class='top_tip'>

<view class="welcome">欢迎您来到阳康宝典</view>

<view class="welcome">一个病友交流论坛</view>

<form catchsubmit="formSubmit">

<view class='login'>

<view class="user">用户名

<view class="hold"><input class="input" name='username' type='text' placeholder='请输入用户名'></input></view>

</view>

<view class="password">密码

<view class="hold2"><input class="input" name='password' password placeholder='请输入密码'></input></view>

</view>

</view>

<button style="width:80vw" class="click" plain="true" type="default" form-type='submit'>登录</button>

<button style="width:80vw" class="click" plain="true" type="default" bindtap="youke">游客登录</button>

</form>

</view>

<view class="reg" bindtap="toReg">没有账号?</view>`
- Js:
// pages/login/login.js

const app = getApp()

Page({

/\*\*

\* 页面的初始数据

\*/

data: {

},

formSubmit(e) {

console.log('form发生了submit事件,携带数据为:', e.detail.value)

wx.request({

// url: 'http://127.0.0.1:5000/cms/user/login',

url: 'http://192.168.137.1:5000/cms/user/login',

method: 'POST',

data: {

username: e.detail.value.username,

password: e.detail.value.password

},

header: {

'content-type': 'application/json' // 默认值

},

success:function(res) {

var obj = res.data

console.log(obj)

wx.setStorage({

key:"token",

data:obj.access_token

})

wx.setStorage({

key:"username",

data:e.detail.value.username

})

if(obj.code == 10031) {

wx.showToast({

title: '用户名或密码错误',

icon: 'error'

});

}

else if(obj.code == 10030) {

wx.showToast({

title: '用户名或密码不能为空',

icon: 'error'

});

}

else {

wx.showToast({

title: '登录成功',

})

wx.switchTab({

url: '/pages/allshudong_page/allshudong',

})

}

}

})

},

toReg(){

wx.navigateTo({

url: '/pages/register_page/home1',

})

},

youke(){{

wx.switchTab({

url: '/pages/allshudong_page/allshudong',

})

}}

})
注册界面:
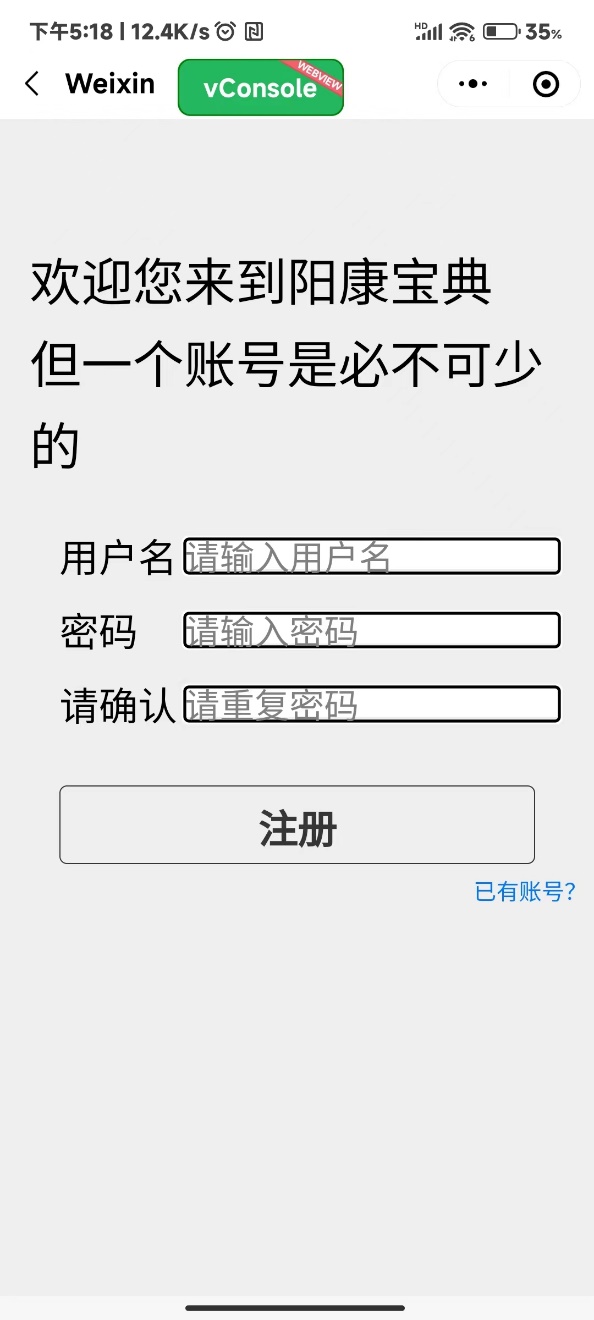
- Wxml:
<!--index.wxml-->

<view class='top_tip'>

<view class="welcome">欢迎您来到阳康宝典</view>

<view class="welcome">但一个账号是必不可少的</view>

<form catchsubmit="onSubmit">

<view class='login'>

<view class="user">用户名

<view class="hold"><input class="input" name='username' type='text' placeholder='请输入用户名'></input></view>

</view>

<view class="password">密码

<view class="hold2"><input class="input" name='password' password placeholder='请输入密码'></input></view>

</view>

<view class="confirm">请确认

<view class="hold"><input class="input" name='confirm_password' password placeholder='请重复密码'></input></view>

</view>

</view>

<button style="width:80vw" class="click" plain="true" type="default" form-type='submit'>注册</button>

</form>

</view>

<view class="reg" bindtap="toLogin">已有账号?</view>
- Js:
// index.js

// const app = getApp()

const app = getApp()

Page({

data: {

},

onSubmit: function (e) {

console.log(e.detail.value);

var that= this

wx.request({

// url: 'http://127.0.0.1:5000/cms/user/register',

url: 'http://192.168.137.1:5000/cms/user/register',

method: 'POST',

data: {

username: e.detail.value.username,

password: e.detail.value.password,

confirm_password: e.detail.value.confirm_password

},

header: {

'content-type': 'application/json' // 默认值

},

success:function(res) {

var obj = res.data

console.log(obj)

if(obj.code == 10030) {

wx.showToast({

title: JSON.stringify(obj.message),

icon: 'error'

});

}else if(obj.code == 10071) {

wx.showToast({

title: JSON.stringify(obj.message),

icon: 'error'

});

}else {

wx.showToast({

title: '注册成功',

icon: 'success'

})

}

}

})

},

toLogin(e) {

wx.reLaunch({

url:'/pages/login_page/login',

});

}

});
广场界面:
- Wxml:
<!-- pages/allshudong_page/allshudong.wxml-->

<view class='container'>

<view class="comment-list">

<block wx:for="{{array}}">

<view class="line"></view>

<navigator url='/pages/oneshudong_page/oneshudong?id={{item.id}}'>

<view class="comment-item">

<view class="Onetitle">{{item.title}}</view>

<view class="Oneauthor">{{item.author}}</view>

</view>

</navigator>

</block>

</view>

</view>
Js:
// pages/allshudong_page/allshudong.js

Page({

/\*\*

\* 页面的初始数据

\*/

data: {

array:[]

},

onLoad(options) {

var that= this

wx.request({

//url: 'http://127.0.0.1:5000/v1/book/',

url: 'http://192.168.137.1:5000/v1/book/',

method:'GET',

data: {

//无

},

header: {

'Authorization': 'Bearer '+wx.getStorageSync('token')

},

success (res) {

console.log(res.data)

that.setData({

array: (res.data).reverse()

})

}

})

},

onPullDownRefresh() {

this.onLoad()

wx.showToast({

title: '刷新成功',

icon: 'success'

})

wx.stopPullDownRefresh()

},

})
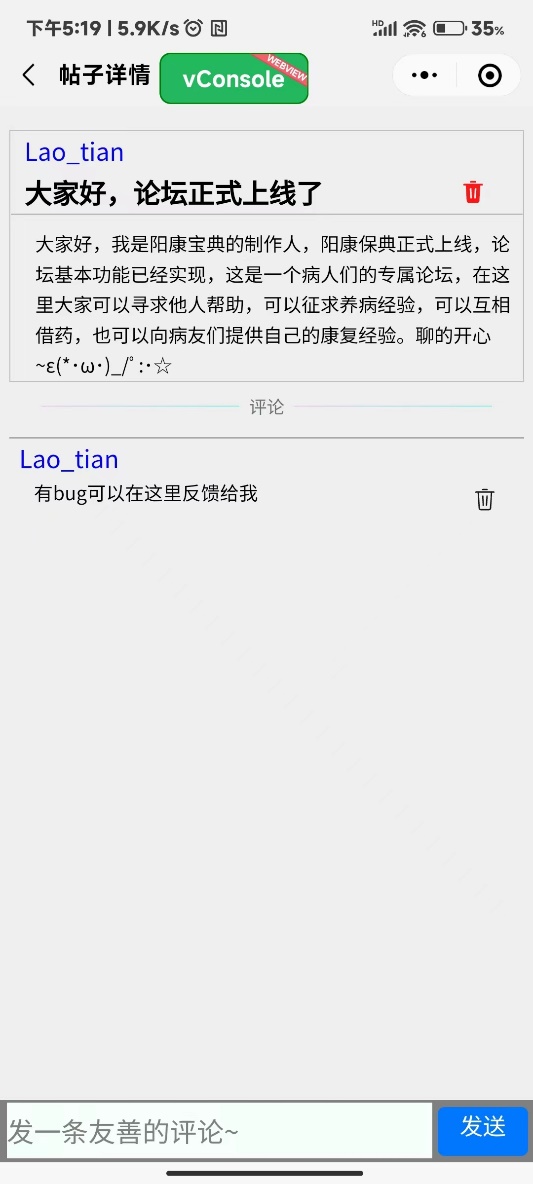
帖子详情及评论:
- Wxml:
<!--pages/demo02/text/text.wxml-->

<view class='tiezi'>

<view class='demo-box'>

<view class="Theauthor">{{author}}</view>

<view style="display: flex;">

<view class="Thetitle">{{title}}</view>

<mp-icon style="margin-right: 20rpx;" type="field" icon="delete" color="red" size="{{20}}" bindtap= 'delete'></mp-icon>

</view>

<view class="line"></view>

<view class="Thesummary">{{summary}}</view>

</view>

<!-- 分割线 -->

<view class="view_fengexian">

<view ></view>

<text class="text_fengexian">评论</text>

<view ></view>

</view>

<!-- 评论区 -->

<view class="comment-list">

<block wx:for="{{array}}" wx:key="index">

<view class="line"></view>

<view class="comment-item">

<view class="comment-author">{{item.author}}</view>

<view style="display: flex;">

<view class="comment-content">{{item.comment}}</view>

<mp-icon style="margin-right: 20rpx;" type="outline" icon="delete" color="black" size="{{20}}" bindtap= 'deleteComment' data-index="{{item.id}}"></mp-icon>

</view>

</view>

</block>

</view>

</view>

<!-- 底部发送评论栏 -->

<view class="col">

<view class="search"><input confirm-type="done" placeholder="发一条友善的评论~" placeholder-class="input" class="input" bindinput="bindText"></input></view>

<view class="sendButton" bindtap="send">发送</view>

</view>
Js:
// pages/oneshudong_page/oneshudong.js

Page({

data: {

id:null,

author:null,

title:null,

summary:null,

array:null,

text:null,

\_id:null

},

onLoad(options) {

var that= this

this.setData({

id:options.id

})

//console.log(this.data.id)

// 获取帖子详细内容

wx.request({

// url: 'http://127.0.0.1:5000/v1/book/'+that.data.id,

url: 'http://192.168.137.1:5000/v1/book/'+that.data.id,

method:'GET',

data: {

//无

},

header: {

'Authorization': 'Bearer '+wx.getStorageSync('token')

},

success (res) {

console.log(res.data)

that.setData({

title:res.data.title,

author:res.data.author,

summary:res.data.summary

})

}

})

// 获取评论

wx.request({

url: 'http://192.168.137.1:5000/treehole/reply/'+that.data.id,

method: 'GET',

data: {

//无

},

success (res) {

console.log(res)

that.setData({

array:res.data

})

}

})

},

// 下拉刷新

onPullDownRefresh() {

var that = this

wx.request({

// url: 'http://127.0.0.1:5000/v1/book/'+that.data.id,

url: 'http://192.168.137.1:5000/v1/book/'+that.data.id,

method:'GET',

data: {

//无

},

header: {

'Authorization': 'Bearer '+wx.getStorageSync('token')

},

success (res) {

console.log(res.data)

that.setData({

title:res.data.title,

author:res.data.author,

summary:res.data.summary

})

}

})

// 获取评论

wx.request({

url: 'http://192.168.137.1:5000/treehole/reply/'+that.data.id,

method: 'GET',

data: {

//无

},

success (res) {

console.log(res)

that.setData({

array:res.data

})

}

})

wx.showToast({

title: '刷新成功',

icon: 'success'

})

wx.stopPullDownRefresh()

},

// 删除帖子

delete(e){

var that= this

wx.request({

// url: 'http://127.0.0.1:5000/v1/book/'+that.data.id,

url: 'http://192.168.137.1:5000/v1/book/'+that.data.id,

method: 'DELETE',

data: {

author:wx.getStorageSync('username')

},

header: {

'Authorization': 'Bearer '+wx.getStorageSync('token')

},

success (res) {

var obj= res.data

console.log(obj)

if(obj.code == 14){

wx.showToast({

title: '删除成功',

icon: 'success'

})

}else{

wx.showToast({

title: JSON.stringify(obj.message),

icon: 'error'

})

}

}

})

wx.request({

url: 'http://192.168.137.1:5000/treehole/reply/all/'+that.data.id,

method: 'DELETE',

data: {

author:wx.getStorageSync('username')

},

header: {

'Authorization': 'Bearer '+wx.getStorageSync('token')

},

success (res) {

var obj= res.data

console.log(obj)

if(obj.code== 14){

wx.showToast({

title: '删除成功',

icon: 'success'

})

}else{

wx.showToast({

title: JSON.stringify(obj.message),

icon: 'error'

})

}

}

})

},

// 删除评论

deleteComment(e){

var that = this

console.log(e.target.dataset.index)

this.setData({

\_id : e.target.dataset.index

})

wx.request({

url: 'http://192.168.137.1:5000/treehole/reply/'+that.data._id,

method: 'DELETE',

data: {

author:wx.getStorageSync('username')

},

header: {

'Authorization': 'Bearer '+wx.getStorageSync('token')

},

success (res) {

var obj= res.data

console.log(obj)

if(obj.code== 14){

wx.showToast({

title: '删除成功',

icon: 'success'

})

}else{

wx.showToast({

title: JSON.stringify(obj.message),

icon: 'error'

})

}

}

})

onPullDownRefresh() //删除评论后自动刷新

},

// 实时获取发送内容

bindText(e){

this.setData({

text:e.detail.value

})

},

// 发送评论

send(e){

var that = this

wx.request({

url: 'http://192.168.137.1:5000/treehole/reply/',

method: 'POST',

data:{

author:wx.getStorageSync('username'),

comment:that.data.text,

image:'none',

this_id:that.data.id

},

header: {

'Authorization': 'Bearer '+wx.getStorageSync('token')

},

success (res){

var obj= res.data

console.log(obj)

if(obj.code== 12){

wx.showToast({

title: '发表评论成功',

icon: 'success'

})

}else{

wx.showToast({

title: JSON.stringify(obj.message),

icon: 'error'

})

}

}

})

}

})
发布界面:
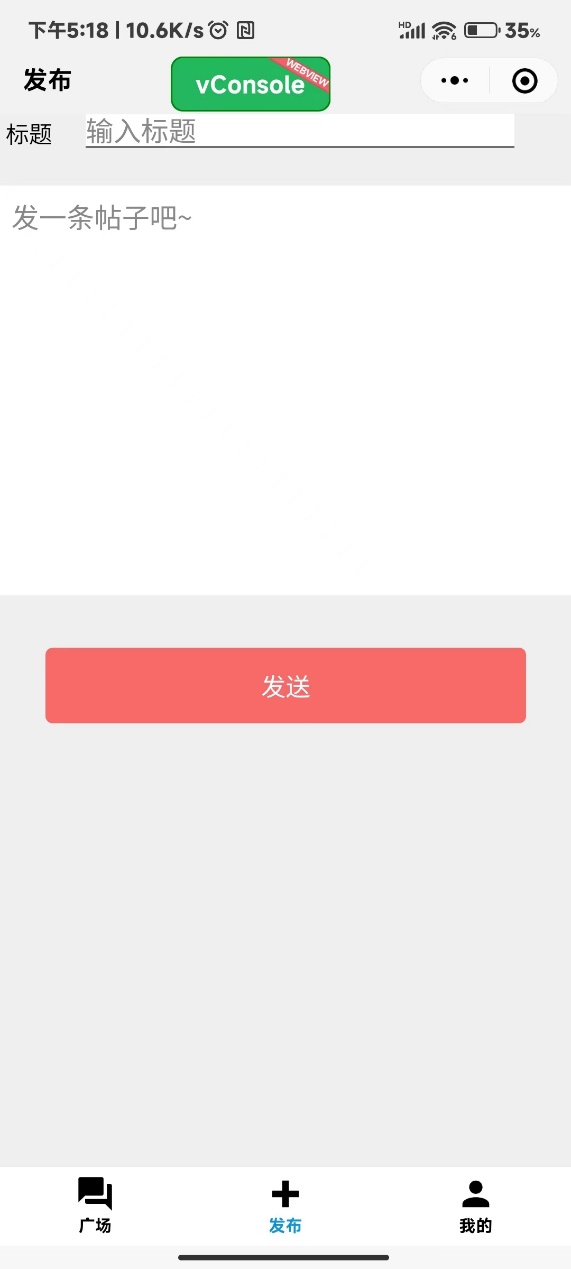
- Wxml:
<!--pages/commit/commit.wxml-->

<text class="text">标题</text>

<input placeholder="输入标题" class='down_line' placeholder-style="color:#888888; font-size:38rpx;" bindinput="bindText"></input>

<view class="textarea">

<textarea placeholder="发一条帖子吧~" placeholder-style="color:#888888; font-size:38rpx;" class='textinput' bindinput="bindTextAreaBlur"></textarea>

</view>

<view id="btn" class="click" bindtap='send'>发送</view>
- Js:
// pages/post_page/post.js

Page({

data: {

title:null,

text:null,

author:null

},

onLoad(options) {

},

bindText(e){

//console.log(e.detail.value)

this.setData({

title:e.detail.value

})

},

bindTextAreaBlur(e){

//console.log(e.detail.value)

this.setData({

text:e.detail.value

})

},

send(e){

var that= this

wx.request({

// url: 'http://127.0.0.1:5000/v1/book/',

url: 'http://192.168.137.1:5000/v1/book/',

method:'POST',

data:{

title:that.data.title,

summary:that.data.text,

author:wx.getStorageSync('username'),

image:'none',

},

header: {

'Authorization': 'Bearer '+wx.getStorageSync('token')

},

success (res) {

var obj= res.data

console.log(obj)

if(obj.code== 10000){

wx.showToast({

title: '您还没有登陆',

icon: 'error'

})

}else if(obj.code== 10030){

wx.showToast({

title: JSON.stringify(obj.message),

icon: 'error'

})

}else if(obj.code== 10240){

wx.showToast({

title: JSON.stringify(obj.message),

icon: 'error'

})

}

else{

wx.showToast({

title: '发送成功',

icon: 'success'

})

}

}

})

}

})
我的界面:
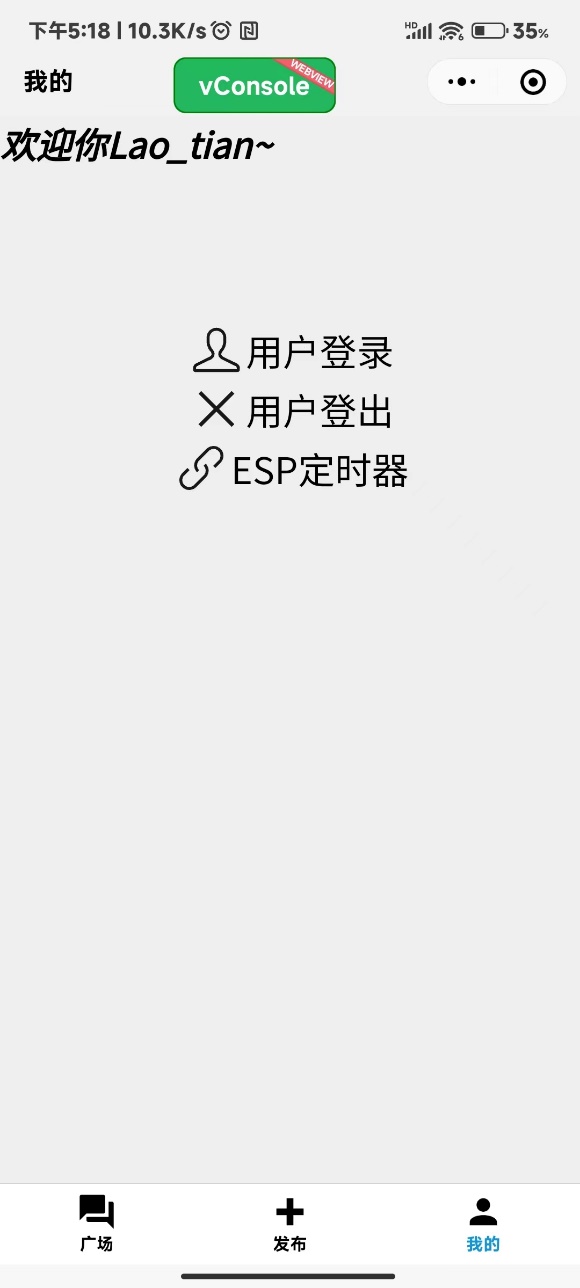
- Wxml:
<!--pages/mine/mine.wxml-->

<!-- <view class="page">

<image class="image" src="/images/myImage.png"></image>

</view> -->

<view class='hello'>

<text>{{welcome}}~</text>

</view>

<view style="margin-top: 100px;">

<view class="info" bindtap="login">

<mp-icon type="outline" icon="me" color="black" size="{{40}}"></mp-icon>

<view style="font-size: 25px;">用户登录</view>

</view>

<view class="info" bindtap="quit">

<mp-icon type="outline" icon="close" color="black" size="{{40}}"></mp-icon>

<view style="font-size: 25px;">用户登出</view>

</view>

<view class="info" bindtap="esp">

<mp-icon type="outline" icon="link" color="black" size="{{40}}"></mp-icon>

<view style="font-size: 25px;">ESP定时器</view>

</view>

</view>
- Js:
// pages/myinfo_page/myinfo.js

Page({

data: {

welcome:null,

},

onLoad(options) {

var that= this

if(wx.getStorageSync('username')== 'null'){

that.setData({

welcome: '您还没有登陆哦'

})

}else{

that.setData({

welcome: '欢迎你'+wx.getStorageSync('username')

})

}

},

login(e){

if(wx.getStorageSync('username')== 'null'){

wx.reLaunch({

url: '/pages/login_page/login',

})

}else{

console.log(wx.getStorageSync('username'))

wx.showToast({

title: '您已经登录!',

icon: 'error'

})

}

},

quit(e){

wx.setStorageSync('username','null')

wx.removeStorageSync('token')

this.setData({

welcome: '您还没有登陆哦'

})

wx.showToast({

title: '退出成功!',

icon: 'success'

})

},

esp(e){

wx.navigateTo({

url: '/pages/clock/index',

})

}

})
ESP定时器界面:
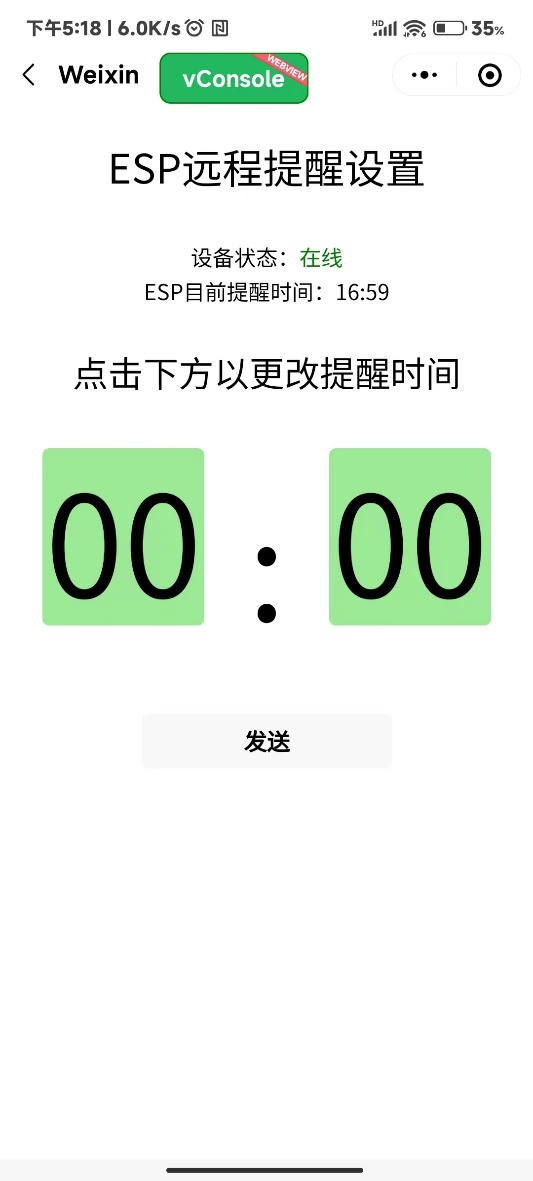
- Wxml:
<!--index.wxml-->

<view style="margin-top:20px;">

<view style="text-align:center;">

<p style="font-size:30px;">ESP远程提醒设置</p>

<view style="margin-top:30px;"> <p>设备状态:</p>

<text style="color: {{statusColor}};">{{device_status}}</text>

</view>

<view style="margin-top:0px;"> <p>ESP目前提醒时间:{{powerstatus}}</p> </view>

<view style="font-size: 50rpx;margin-top: 50rpx;">

点击下方以更改提醒时间

</view>

<picker mode="time" value="{{time}}" start="00:01" end="23:59" bindchange="bindTimeChange">

<view class="flex">

<view class="choose">{{time1}}</view>

<view class="maohao">:</view>

<view class="choose">{{time2}}</view>

</view>

</picker>

<view style="margin-top:30px;">

<view style="margin-top:30px;"> <button bindtap="openclick" >发送</button> </view>

</view>

</view>

\</view>
- Js:
const app = getApp()

Page({

data: {

uid: 'ea565388aea14b9088ebd3801e5488c0',

topic: "timer",

device_status: "离线", //默认离线

powerstatus:"已关闭", //默认关闭

time:"无",

time1:"00",

time2:"00",

statusColor:"red"

},

onLoad: function () {

var that = this

//请求设备状态

//设备断开不会立即显示离线,由于网络情况的复杂性,离线1分钟左右才判断真离线

wx.request({

url: 'https://api.bemfa.com/api/device/v1/status/', //状态api接口,详见巴法云接入文档

data: {

uid: that.data.uid,

topic: that.data.topic,

},

header: {

'content-type': "application/x-www-form-urlencoded"

},

success (res) {

console.log(res.data)

if(res.data.status === "online"){

that.setData({

device_status:"在线",

statusColor: "green"

})

}else{

that.setData({

device_status:"离线",

statusColor: "red"

})

}

console.log(that.data.device_status)

}

})

//请求询问设备开关/状态

wx.request({

url: 'https://api.bemfa.com/api/device/v1/data/1/', //get接口,详见巴法云接入文档

data: {

uid: that.data.uid,

topic: that.data.topic,

},

header: {

'content-type': "application/x-www-form-urlencoded"

},

success (res) {

console.log(res.data)

that.setData({

powerstatus:res.data.msg

})

console.log(that.data.powerstatus)

}

})

//设置定时器,每五秒请求一下设备状态

setInterval(function () {

console.log("定时请求设备状态,默认五秒");

wx.request({

url: 'https://api.bemfa.com/api/device/v1/status/', //get 设备状态接口,详见巴法云接入文档

data: {

uid: that.data.uid,

topic: that.data.topic,

},

header: {

'content-type': "application/x-www-form-urlencoded"

},

success (res) {

console.log(res.data)

if(res.data.status === "online"){

that.setData({

device_status:"在线",

statusColor: "green"

})

}else{

that.setData({

device_status:"离线",

statusColor: "red"

})

}

console.log(that.data.device_status)

}

})

//请求询问设备开关/状态

wx.request({

url: 'https://api.bemfa.com/api/device/v1/data/1/', //get接口,详见巴法云接入文档

data: {

uid: that.data.uid,

topic: that.data.topic,

},

header: {

'content-type': "application/x-www-form-urlencoded"

},

success (res) {

console.log(res.data)

that.setData({

powerstatus:res.data.msg

})

console.log(that.data.powerstatus)

}

})

}, 5000)

},

openclick: function() {

var that = this

that.setData({

powerstatus:"已打开"

})

//控制接口

wx.request({

url: 'https://api.bemfa.com/api/device/v1/data/1/', //api接口,详见接入文档

method:"POST",

data: { //请求字段,详见巴法云接入文档,http接口

uid: that.data.uid,

topic: that.data.topic,

msg:that.data.time //发送消息为on的消息

},

header: {

'content-type': "application/x-www-form-urlencoded"

},

success (res) {

console.log(res.data)

wx.showToast({

title:'发送成功',

icon:'success',

duration:1000

})

}

})

},

bindTimeChange: function(e) {

console.log('picker发送选择改变,携带值为', e.detail.value)

this.setData({

time: e.detail.value,

time1:e.detail.value.slice(0, 2),

time2:e.detail.value.slice(3, 5),

})

},

})
-
硬件(ESP8266-NodeMCU 1.0)
#include <Arduino.h>

#include <U8g2lib.h>

#include <Wire.h>

#include <NTPClient.h>

#include <ESP8266WiFi.h>

#include <WiFiUdp.h>

WiFiUDP ntpUDP;

一些包含的头文件

//巴法云服务器地址默认即可

#define TCP_SERVER_ADDR "bemfa.com"

//服务器端口,tcp创客云端口8344

#define TCP_SERVER_PORT "8344"

#define DEFAULT_STASSID "LAO_TIAN" //WIFI名称,区分大小写,不要写错

#define DEFAULT_STAPSW "12345678" //WIFI密码

String UID = "ea565388aea14b9088ebd3801e5488c0"; //用户私钥,可在控制台获取,修改为自己的UID

String TOPIC = "timer"; //主题名字,可在控制台新建

连接巴法云

//最大字节数

#define MAX_PACKETSIZE 512

//设置心跳值30s

#define KEEPALIVEATIME 60*1000

//tcp客户端相关初始化,默认即可

WiFiClient TCPclient;

String TcpClient_Buff = "";

unsigned int TcpClient_BuffIndex = 0;

unsigned long TcpClient_preTick = 0;

unsigned long preHeartTick = 0;//心跳

unsigned long preTCPStartTick = 0;//连接

bool preTCPConnected = false;

// 设置屏幕

U8G2_SSD1306_128X64_NONAME_1_SW_I2C u8g2(U8G2_R0, 14 , 5, U8X8_PIN_NONE); // All Boards without Reset of the Display

NTPClient timeClient(ntpUDP, "cn.ntp.org.cn", 8 * 60 * 60, 60000);

String setTime="10:00";

int button = 0;

int bee = 13;

int value = 1;

int judge;

//相关函数初始化

//连接WIFI

void doWiFiTick();

void startSTA();

//TCP初始化连接

void doTCPClientTick();

void startTCPClient();

void sendtoTCPServer(String p);

void set_time(String get);

void setup(void) {

pinMode(bee, OUTPUT);

pinMode(button, INPUT_PULLUP);

Serial.begin(115200);

Serial.println("Beginning...");

timeClient.begin();

Serial.println ( "网络时钟初始化完成" );

u8g2.begin();

}

void loop(void) {

// wifi

doWiFiTick();

// 网络获取时间

timeClient.update();

String nowtime = timeClient.getFormattedTime();

// Serial.println(nowtime);

String hours = nowtime.substring(0, 2);

String minutes = nowtime.substring(3, 5);

String seconds = nowtime.substring(6, 8);

通过网络获取时间

const char *hour = hours.c_str();

const char *minute = minutes.c_str();

const char *second = seconds.c_str();

// 在屏幕显示时间

u8g2.firstPage();

do {

u8g2.setFont(u8g2_font_unifont_t_chinese2);

u8g2.drawStr(30,15,hour);

u8g2.drawStr(50,15,":");

u8g2.drawStr(60,15,minute);

u8g2.drawStr(80,15,":");

u8g2.drawStr(90,15,second);

u8g2.drawStr(10,30,setTime.substring(0,2).c_str());

u8g2.drawStr(30,30,":");

u8g2.drawStr(40,30,setTime.substring(3,5).c_str());

} while ( u8g2.nextPage() );

OLED显示屏显示时间、已设置的闹铃定时等

// 控制到达设置时间时启动蜂鸣

if(value == 1){ //若没有按过按钮

if(strcmp(hours.c_str(),setTime.substring(0,2).c_str()) == strcmp(minutes.c_str(),setTime.substring(3,5).c_str())){

digitalWrite(bee,HIGH);

Serial.println("Bee On");

value=digitalRead(button);

if(value == 0){

digitalWrite(bee,LOW);

Serial.println("Bee Stop");

judge = minutes.toInt();

}

}

}

if(value == 0){ //按下按钮后判定一分钟内不再响铃

if(minutes.toInt() == judge + 1){

value = 1;

}

}

// 连接tcp

doTCPClientTick();

}

/*

*发送数据到TCP服务器

*/

void sendtoTCPServer(String p){

if (!TCPclient.connected())

{

Serial.println("Client is not readly");

return;

}

TCPclient.print(p);

Serial.println("[Send to TCPServer]:String");

Serial.println(p);

preHeartTick = millis();//心跳计时开始,需要每隔60秒发送一次数据

}

/*

*初始化和服务器建立连接

*/

void startTCPClient(){

if(TCPclient.connect(TCP_SERVER_ADDR, atoi(TCP_SERVER_PORT))){

Serial.print("nConnected to server:");

Serial.printf("%s:%d\r\n",TCP_SERVER_ADDR,atoi(TCP_SERVER_PORT));

String tcpTemp=""; //初始化字符串

tcpTemp = "cmd=1&uid="+UID+"&topic="+TOPIC+"\r\n"; //构建订阅指令

sendtoTCPServer(tcpTemp); //发送订阅指令

tcpTemp="";//清空

preTCPConnected = true;

TCPclient.setNoDelay(true);

}

else{

Serial.print("Failed connected to server:");

Serial.println(TCP_SERVER_ADDR);

TCPclient.stop();

preTCPConnected = false;

}

preTCPStartTick = millis();

}

/*

*检查数据,发送心跳

*/

void doTCPClientTick(){

//检查是否断开,断开后重连

if(WiFi.status() != WL_CONNECTED) return;

if (!TCPclient.connected()) {//断开重连

if(preTCPConnected == true){

preTCPConnected = false;

preTCPStartTick = millis();

Serial.println();

Serial.println("TCP Client disconnected.");

TCPclient.stop();

}

else if(millis() - preTCPStartTick > 1*1000)//重新连接

startTCPClient();

}

else

{

if (TCPclient.available()) {//收数据

char c =TCPclient.read();

TcpClient_Buff +=c;

TcpClient_BuffIndex++;

TcpClient_preTick = millis();

if(TcpClient_BuffIndex>=MAX_PACKETSIZE - 1){

TcpClient_BuffIndex = MAX_PACKETSIZE-2;

TcpClient_preTick = TcpClient_preTick - 200;

}

}

if(millis() - preHeartTick >= KEEPALIVEATIME){//保持心跳

preHeartTick = millis();

Serial.println("--Keep alive:");

sendtoTCPServer("cmd=0&msg=keeprn");

}

}

if((TcpClient_Buff.length() >= 1) && (millis() - TcpClient_preTick>=200))

{//data ready

TCPclient.flush();

Serial.print("Rev string: ");

TcpClient_Buff.trim(); //去掉首位空格

Serial.println(TcpClient_Buff); //打印接收到的消息

String getTopic = "";

String getMsg = "";

if(TcpClient_Buff.length() > 15){

//注意TcpClient_Buff只是个字符串,在上面开头做了初始化StringTcpClient_Buff = "";

//此时会收到推送的指令,指令大概为 cmd=2&uid=xxx&topic=light002&msg=off

int topicIndex = TcpClient_Buff.indexOf("&topic=")+7;

//c语言字符串查找,查找&topic=位置,并移动7位,不懂的可百度c语言字符串查找

int msgIndex = TcpClient_Buff.indexOf("&msg=");

//c语言字符串查找,查找&msg=位置

getTopic = TcpClient_Buff.substring(topicIndex,msgIndex);

//c语言字符串截取,截取到topic,不懂的可百度c语言字符串截取

getMsg = TcpClient_Buff.substring(msgIndex+5);

//c语言字符串截取,截取到消息

Serial.print("topic:------");

Serial.println(getTopic);

//打印截取到的主题值

Serial.print("msg:--------");

Serial.println(getMsg);

//打印截取到的消息值

// set_time(getMsg);

//将获取到的时间转化为时、分,并存储起来

setTime = getMsg;

}

TcpClient_Buff="";

TcpClient_BuffIndex = 0;

}

}

void startSTA(){

WiFi.disconnect();

WiFi.mode(WIFI_STA);

WiFi.begin(DEFAULT_STASSID, DEFAULT_STAPSW);

}

/\*\*\*\*\*\*\*\*\*\*\*\*\*\*\*\*\*\*\*\*\*\*\*\*\*\*\*\*\*\*\*\*\*\*\*\*\*\*\*\*\*\*\*\*\*\*\*\*\*\*\*\*\*\*\*\*\*\*\*\*\*\*\*\*\*\*\*\*\*\*\*\*\*\*

WIFI

\*\*\*\*\*\*\*\*\*\*\*\*\*\*\*\*\*\*\*\*\*\*\*\*\*\*\*\*\*\*\*\*\*\*\*\*\*\*\*\*\*\*\*\*\*\*\*\*\*\*\*\*\*\*\*\*\*\*\*\*\*\*\*\*\*\*\*\*\*\*\*\*\*\*\*/

/*

WiFiTick

检查是否需要初始化WiFi

检查WiFi是否连接上,若连接成功启动TCP Client

控制指示灯

*/

void doWiFiTick(){

static bool startSTAFlag = false;

static bool taskStarted = false;

static uint32_t lastWiFiCheckTick = 0;

if (!startSTAFlag) {

startSTAFlag = true;

startSTA();

Serial.printf("Heap size:%d\r\n", ESP.getFreeHeap());

}

//未连接1s重连

if ( WiFi.status() != WL_CONNECTED ) {

if (millis() - lastWiFiCheckTick > 1000) {

lastWiFiCheckTick = millis();

}

}

//连接成功建立

else {

if (taskStarted == false) {

taskStarted = true;

Serial.print("\r\nGet IP Address: ");

Serial.println(WiFi.localIP());

startTCPClient();

}

}

}

// 将获取到的时间转化为时、分,并存储起来

void set_time(String get){

ESP.wdtFeed();

传说中的“喂狗”函数,防止ESP8266复位

}
团队介绍:
| 成员 | 分工 | 贡献率 |
|---|---|---|
| 唐奥 | 创意策划、框架搭建 负责部分硬件搭建 | 55% |
| 田晁旭 | 功能完善与调试 负责部分硬件搭建 | 45% |
团队故事:
这个想法诞生于去年年末疫情解控放开,身边大部分人抗体检测呈阳性,并且还有许多学长学姐处于考研复习的关键期,转阳后心理负担重,产生的巨大的心理压力无处发泄;同时很多人属于第一次“阳”,对于如何复健毫无头绪。综合以上需求,我们构思了一个集提供新冠医疗建议、论坛形式交流倾诉、健康起居打卡检测于一体的小程序“阳康宝典”。
我们最初的重点在“提供新冠医疗建议”上,但随着国家科学有效的开放管控,全国疫情情况已经趋于平稳,维持在一个低峰状态,遂经过成员讨论,将小程序的核心功能定位在“用户论坛”和“健康起居打卡”功能上。
“用户论坛”的灵感来源于BBS具有的发帖、回帖等相关功能,用户在小程序注册后即可拥有发帖、回帖等权限,不过这只是一个雏形,多样化方面(比如有色字、加粗、下划线等基本功能,评论图片,论坛背景等美化工作仍需加强完善。
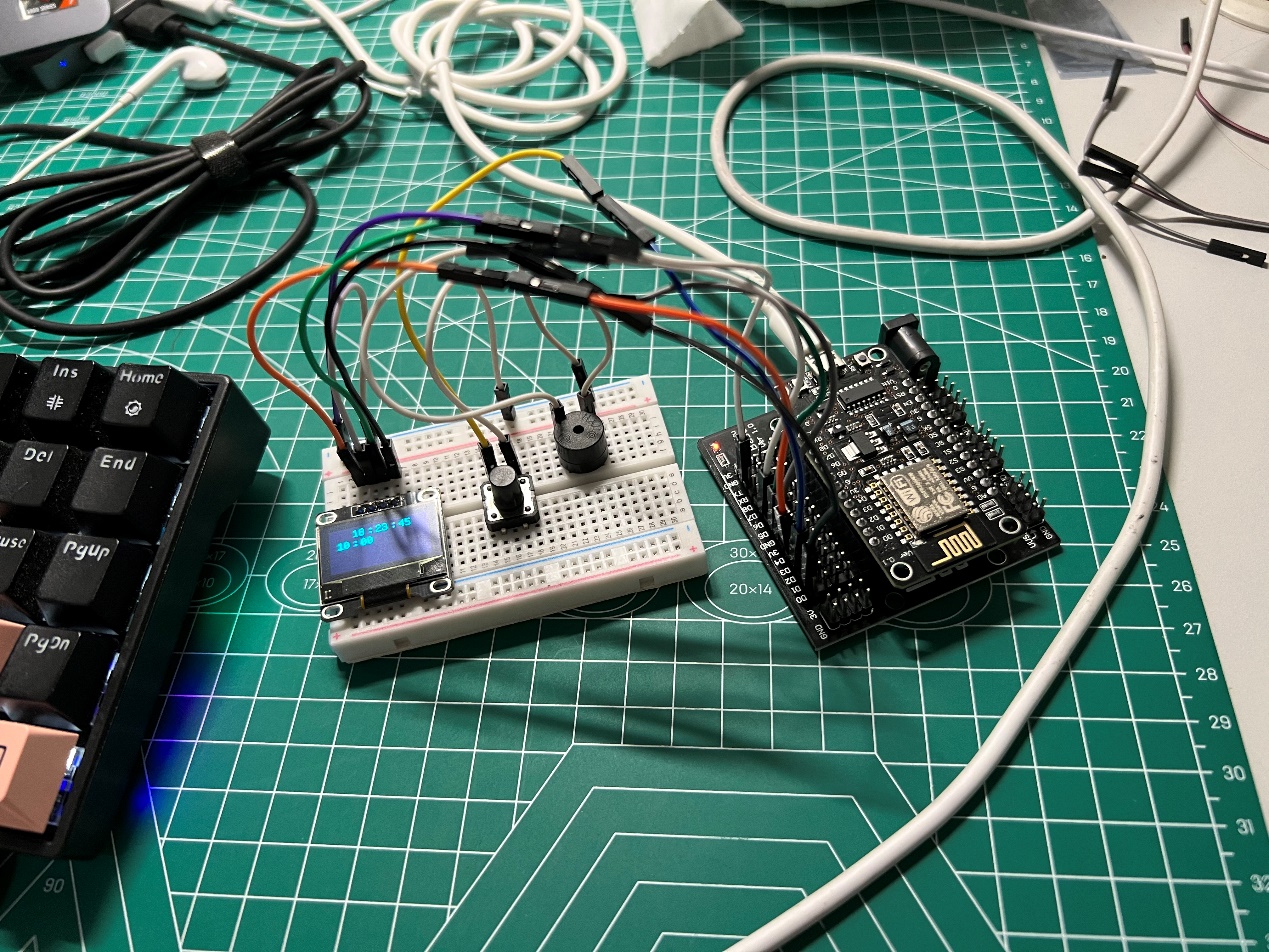
“健康起居打卡”以饮水习惯检测为例,通过ESP8266 Module WiFi模块实现器件(蜂鸣器、OLED显示屏等)与小程序的沟通互动,ESP8266模块连接互联网后自动同步当前时间,并在OLED显示屏上实时显示,用户端通过巴法云发送定时指令,ESP8266接受到信息后从中提取时间并启动定时提醒,提醒到点喝水。
刚开始实现这个功能的时候,采用的是统一发放的ESP8266-S01,发现并不能很好地实现预想功能,ESP8266-S01不能带动蜂鸣器报警,也不能驱动OLED显示时间,基于此我们迅速购买了ESP8266-NodeMCU,顺利解决了问题,继续推进整体的构建。
此后无数个日日夜夜里,我们在努力攻克不断产生的新问题,终于让整个构想小有雏形。
不知道经过了多少天,我们设想的核心功能——定时提醒打卡功能终于完成了,尽管功能有些简陋,但聊胜于无哈哈哈。
导论是一个绝佳的机会,让我们去尝试,去努力,去探求解决方法。我们看见了自身存在的不足,并努力补齐短板。在实现的过程中,不仅学到了有用的拓展知识,锻炼了自己debug的能力,而且培养了我们团队协作的精神,培养了我们坚持到底锲而不舍的精神。
B站视频
https://www.bilibili.com/video/BV1Jc411u71e/
GitHub代码
https://gitee.com/ling_da_jin/Yangkang_book
参考资料: